Self-watering containers are an excellent solution for gardeners who want to reduce the frequency of manual watering. They are especially useful for growing plants in hot climates or for people with busy schedules. These containers have a reservoir that provides a consistent water supply to the roots, promoting healthier plant growth. In this article, we will show you how to build your own self-watering containers using simple materials.
Materials Needed:
- Plastic containers (storage bins, buckets, or large tubs)
- PVC pipe (1–2 inches in diameter)
- Gravel or small rocks
- Potting soil
- Drill
- Water bottles (optional, for easier watering)
Step-by-Step Instructions:
Step 1: Prepare the Container
Choose a plastic container that is large enough for your plants. Drill a few small holes at the bottom of the container to allow for drainage.
Step 2: Create a Water Reservoir
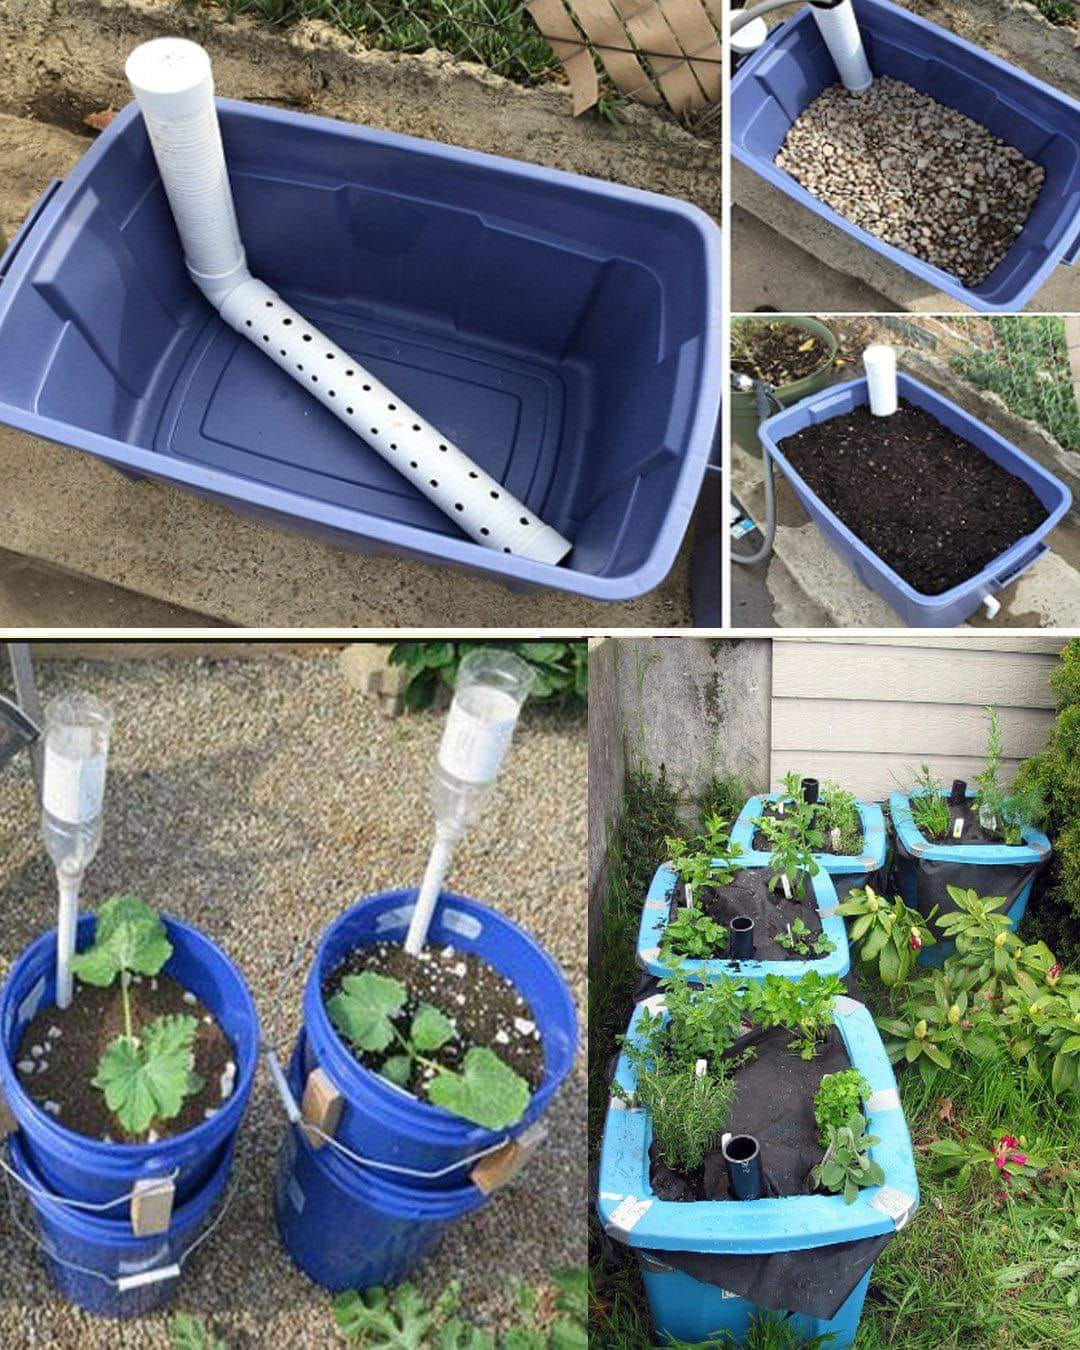
Insert a PVC pipe into the container. The pipe should be perforated with small holes along its length. Position it at the bottom of the container as shown in the image, forming a U-shape that allows water to enter and be distributed evenly. This will serve as your water reservoir, providing moisture to the soil.
Step 3: Add Gravel
Add a layer of gravel or small rocks on top of the pipe. This creates a barrier between the soil and the water reservoir. The gravel helps distribute the water more evenly throughout the container and keeps the soil from getting waterlogged.
Step 4: Fill With Soil
Cover the gravel with potting soil. Ensure the soil is packed tightly around the PVC pipe. This will allow the soil to wick water from the reservoir up to the plant roots.
Step 5: Watering System (Optional)
If you want to make watering even easier, attach water bottles with small holes near the top to the PVC pipe, as shown in the picture. Fill the bottles with water, and gravity will help distribute the water into the container.
Step 6: Plant Your Crops
Now that your self-watering container is ready, it’s time to plant! Add your favorite vegetables, herbs, or flowers. The container will provide consistent moisture, ensuring your plants stay hydrated without frequent watering.
Benefits of Self-Watering Containers
- Water Efficiency: Self-watering containers conserve water by delivering it directly to the plant roots, reducing evaporation and runoff.
- Time-Saving: With a built-in reservoir, you can water less frequently, making it perfect for busy gardeners or those going on vacation.
- Healthier Plants: By providing consistent moisture, these containers promote stronger root systems and healthier growth.
- Ideal for Urban Gardening: Whether you live in an apartment or have a small backyard, self-watering containers are perfect for maximizing space and growing your own food.
Conclusion
Building your own self-watering containers is an easy and cost-effective way to ensure your plants get the moisture they need. With just a few materials and some simple steps, you can create a system that reduces your workload and improves the health of your plants. Whether you’re growing vegetables, herbs, or flowers, this method is perfect for keeping your garden thriving.


Nhận xét
Đăng nhận xét